
I’ve had this wonderful white dough on my to-do list all year and I’m now wishing I’d tried it earlier as it’s fabulous, versatile and offers a fun alternative to the usual salt dough. It can be used to make ornaments for Christmas, decorations, handprints and clay models and we will definitely be using it a lot more in the coming months for all sorts of art and learning projects together!
I found the recipe for this baking soda [bicarbonate of soda] white clay dough via Show Tell Share.
How to make white clay:
1 cup bicarbonate of soda (baking soda)
1/2 cup corn flour (corn starch)
3/4 cup of warm water
silver glitter
Mix the dry ingredients in the pan then stir through the warm water. Mix over a medium heat, stirring as it starts to bubble and come away from the sides of the pan. When it has started to dry and resemble a soft play dough consistency, take it off the heat and leave it to cool for a few minutes. Turn it out onto the counter and knead it for a couple of minutes to make it super soft and pliable. It should look and feel like bright white play dough!
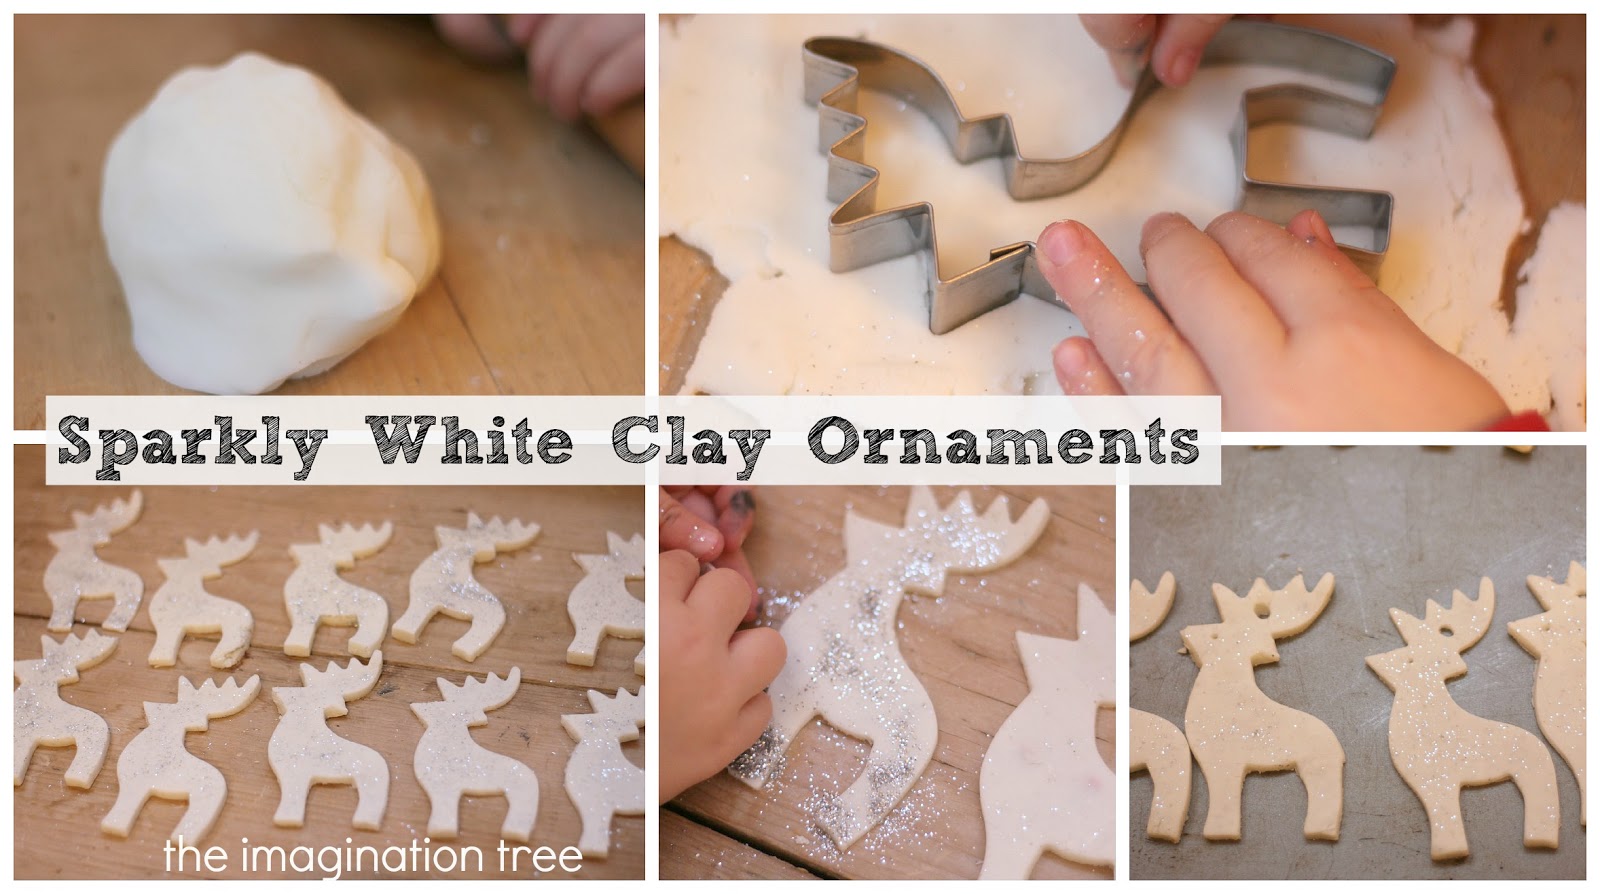
We kneaded the warm dough and rolled it out straight onto the table, then sprinkled glitter over the top to make it sparkle! The silver glitter mixed with the pure white dough looks so simple and stunning that no other decorations are really needed. They used reindeer shaped cookie cutters to cut shapes, then stuck a straw through the top to make a hole for threading twine through later on.
We then popped them straight onto a baking sheet and dried them in the oven at 100 degrees C (or 200 F) for an hour. They also dry perfectly if jut left out in the air at room temperature for a day or so, depending on the thickness of the dough. Ours were thin and dried very fast (not really even needing the full hour in the oven.)

Once they were hard we threaded twine through the holes (great for fine motor skills, concentration and perseverance!) and hung them from a branch in a vase. When we get our Christmas tree we will hang them on it, and give away some to friends and family wrapped in tissue paper.
This clay can also be coated with varnish or mode podge, painted using acrylic or metallic paints or covered with glue and dipped in glitter. It would also take colour very well if it was mixed in during initial pan cooking stage. We are trying that next!
Here’s what they are learning while they play:
motor skills: mixing, kneading, rolling, cutting, squeezing the dough; threading the twine; hanging carefully by the loops
maths: measuring quantities
science: observing change in state of materials from dry to malleable to hard
literacy: following instructions, reading recipes
Cakie: 4.3
Pop: 2.8
Bean: 9 mos
See our other ornaments too!
Handprint and Footprint Keepsakes
Easy Salt Dough Ornaments
Salt Dough Initials
Enter your email address:
Delivered by FeedBurner
Beautiful!! We made some white snow flakes yesterday with blue glitter. They turned out great, I have to agree much nicer than salt dough. xx
These are beautiful ornaments. I love that you used a reindeer. We’ll have to give your recipe a try.
This is so awesome and I love that I can make the dough from stuff I have in my kitchen!!! I am bad at crafts in general but I can actually pull this one off! I’m excited to try with my kids!!! Thanks!!!!!!!
Beautiful! Will definitely make these instead of salt dough.
These are really pretty decorations. I’m going to try this out with my little ones. Thank you for sharing, I really enjoy your blog 🙂
oh they are beautiful. We tried these last year and I loved the way the cornflour sparkled!
Gorgeous. Your daughter’s face says it all.
Beautiful! It would be cute with snowman cutouts, too. Thanks for sharing!
My dough turned out really crumbly, even after adding extra water. What did I do wrong?
These are lovely, what a nice alternative to salt dough, thanks
These are so pretty! Please consider sharing this at Eco-Kids Tuesday Link-Up! http://likemamalikedaughter.blogspot.com/2012/12/eco-kids-tuesday.html
Made them today! Boys and mama delighted. Thank you. You can check them out on our blog.
http://toddlerinthehole.blogspot.co.uk/2012/12/sparkly-white-ornaments.html
toddler-in-the-hole! brilliant name 🙂
so beautiful!! these would look fantastic on anyones tree! pinned
Please, can someone give me some tips? When I added the water it immediately clumped up and there was absolutely no water left to ‘start to bubble’. It did pull away from the pan a bit and sorta stayed together but when we tried to knead it all we got was a crumbly mess – so I added a bit more water which made it stick together but then it stuck to everything – the cutting board, the cookie cutters – a real mess and very disappointed darlings. I know we must have done something wrong – so please, those that have done this successfully – share your secret!!
Ahhahahahaha, I’m laughing at myself. I see what I did wrong – I’m surprised we got anything near this considering what I did wrong – yikes – will try again asap!
You can delete my previous messages. When you do it correctly – this is a great recipe!! Thank you 🙂
Any suggestions for an oven that only goes down to 150 degrees. I put them in for about 40 min but they were cracking. We made them a little thicker. I have set them out to dry but they are still creaking and breaking apart. They feel really damp still. Any suggestions?
Eva – ours did the same thing so we made a new batch and air dried them instead. Two days later they were rock hard and no cracking so much easier than risking the oven again i think.
Thanks!!! I think we’ll try it again!
This comment has been removed by the author.
We cooked ours but they still seemed damp so I set them near the heater overnight which worked great. I found ours were curling a bit so I put a second baking sheet on top with a little weight so that they would dry flat. I think next time we’ll make them even thinner.
Wow, a new “salt” dough to add to our crafting. We have made love hearts to hang on the tree. I have also made some giant baubles, cut around a small plate. I child mind so thought a lovely gift to take home for parents is a printed hand print. Going to leave white and do the hand-print in gold on one side and in silver on the back write their name and the year. I have done this with Salt Dough on the first week when the little one started with me and again 4 months later on his 1st birthday. His parents love this and have made more to give to family as gifts
Can’t WAIT to make this with the kids!!!! I love how classy they look. Gorgeous white!
making these tomorrow morning! Thank you!
can I ask what modge podge is? I was thinking of mixing silver glitter with clear PVA to varnish them and then give them as gifts. We also have a shooting sta cutter which I think will be a hit
The BEST! We can’t stop to play with it!!! Thanks a lot for the working recipe!!!
I tried making these the other day but they crumbled and fell apart… Then yesterday I realised I’d used baking powder instead of bicarb *smacks forehead*. I shall have to try again! (I wonder if this is what Cosmic Parent did too?)
So we made these today – I did roll the dough quite thinly and dried for 40min in a 95degree oven but they rose in teh centre and cracked badly. Any hints on what else to try?
Love the idea! .We made some stars & snowman they came out great. Thanks for the recipe.
Did this with 3 3 year old girls today! Came out fab! We ended up with a whole tube of pink glitter in it! Lovely texture to the dough they did crack slightly after cooking but my fault for putting the oven on too high! Thankyou 🙂
I made this today – I had two versions of it pinned but your use of the words “super soft and pliable” drew me to yours – I think I loved the word “pliable” in particular – see http://www.conqueringcrafts.com/2012/12/more-glitter-also-bubbles.html
I am air drying mine ’cause I got fed up of using the oven after doing several batches of cookies yesterday!
Thanks for the recipe.
My kids’ ornaments all cracked in the center once they dried up…does anybody know why would this happen and ideas to solve this? Thanks 🙂