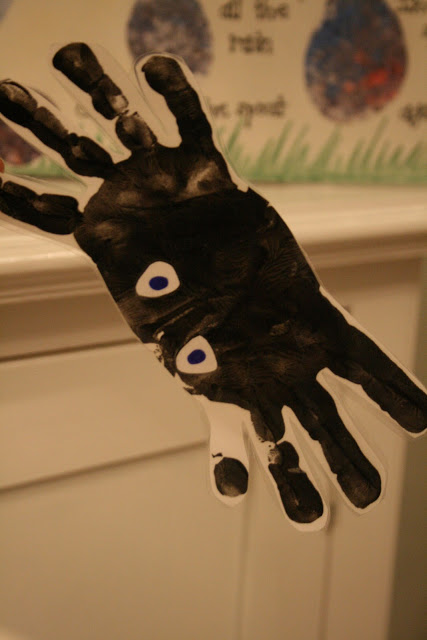
First of all she did (innumerable) hand-prints onto white paper using black paint. I let her do loads on her own and then I helped her to put 2 prints back to back, slightly overlapping, to make a spider.
When they dried I cut closely around the whole shapes, cutting off the thumbs to leave 8 legs. We did two so that she could have one to play with too!

She wanted to do more painting/printing so she helped herself to some blue and silver and layered up prints into a lovely mess. I was going to throw it away but decided instead to use it to cut out some rain drops to add to the song sheet.

I have been in love with my new A3 laminator that I got for Christmas and am laminating everything in sight. I have been waiting for this before I could start the song sheets as they need to be large and tough enough to withstand some rough play! Ahhh, little laminator, there you are 🙂

On an A3 sheet I stuck on the main parts of the story using the raindrops cut from the blue painted mess, a simple drain-pipe shape and a sun cut out from a yellow collage that she made a few months back. Recycling previous crafts feels like a good way to show-case them!
I drew around the spider, one rain-drop and the sun shapes and labelled them. I then removed them before I laminated the main sheet so that they can be stuck on and taken off while the song is sung, making it an interactive song sheet. I want to use velcro tape which is extremely durable and sticks really well to laminate, but I have run out so am just going to use blu-tac for now.
Here is the sheet with the main parts removed.
While we sing the song together she plays with these and matches them up to the correct shape.
Happy singing!


oh that looks great…. I really do need a lamintor don’t I!
Oh yes you really do! think of the possibilities 🙂
This is so gorgeous! I bought an A4 laminator last year and we’ve had so much fun making little people and bookmarks with pressed flowers – but this is a fantastic, creative idea. I love your hand lettering too 🙂
Oh, and the raindrops are just perfect, aren’t they? Well done little Cakie!
I never think about laminating my kid’s drawing before. this is a great idea. Anyway, what kind of laminator that you use to laminate it? thanks.
I love this idea, I used to make all sorts of resources like this when I was teaching. I really must get back into the habit 🙂
Loving the January posts so far, Anna! I love my laminator too – have you ever put anything other than paper in? We love putting thread, glitter and sprinkles in ours – the result is fab and makes wonderful dragonfly wings, or butterfly wings, stick-ons for those vital thank you cards, or even bookmarks for a small gift. The little ones are intrigued as it slowly comes out all shiny. Am quite sure you have done this before though!
I love that she has her hand in helping to make this wonderful project.
How super cute!!! I love it!
Thank you Abi! It’s really lovely to get comments and you are right, the laminator has limitless possibilities 🙂 I got my first one way back when teacher training and used to make all sorts of things, but lost it during our move over a year ago and was beginning to go spare! We haven’t made butterfly wings- those sound fab! It is great for window pictures and stained glass too. x
So cute, of we go to make our own songs. Thanks, We do not have a laminator but will use contact plastic, hope it will last a bit. Esther
Oh my, this is simply TOO TOO TOO cute! I adore it. I love how you let her have fun with lots of handprints and used the “result” as water drops. BRILLIANT. This is just too lovely.
I would LOVE for you to join us at Kids Get Crafty (every Wednesday on Red Ted Art) – current link up http://www.redtedart.com/2011/01/19/kids-get-crafty-penguins-boys-umbrellas-card-board-boxes/
Hope to see you there!
Maggy
I love this idea! Thanks for posting!
love it!!!!!